In this comprehensive guide, I'll walk you through sending your first broadcast email using MailDiver - from initial setup to hitting that send button with confidence.
Whether you're new to email marketing or switching from another platform, this guide will help you get started quickly and effectively. If you're still evaluating email platforms, check out our comparison guides for best Mailchimp alternatives, top Klaviyo alternatives, best Omnisend alternatives, and best SendGrid alternatives. For specific platform comparisons, see our MailDiver vs Klaviyo and MailDiver vs Mailchimp analyses.
What Are Broadcast Emails?
Broadcast emails (also called email campaigns or bulk emails) are one-to-many messages you send to your entire subscriber list or specific segments at a scheduled time. Unlike automated emails that trigger based on user actions, broadcasts are manually sent by marketers for time-sensitive announcements.
When to Use Broadcast Emails
Send broadcast emails when you have time-sensitive information or announcements that your entire audience (or segments) should receive at the same time:
- Newsletters – Regular updates and valuable content for your subscribers
- Product announcements – Launching new features or services
- Company updates – Sharing milestones, team changes, or important news
- Event invitations – Promoting webinars, conferences, or meetups
- Special offers – Limited-time promotions and exclusive deals
Unlike transactional emails (like password resets), broadcast emails are designed to engage, inform, and build relationships with your audience.
Broadcast Email Strategy: Before You Start
Timing Your Broadcasts
- B2B audiences: Tuesday-Thursday, 10am-11am local time (highest open rates)
- B2C audiences: Varies by industry; test your audience
- Newsletters: Consistent day/time builds subscriber expectation
Subject Line Tips
- Keep under 50 characters for mobile visibility
- Use personalization:
{{ first_name }}when available - Avoid spam triggers: ALL CAPS, excessive !!!, "FREE", "ACT NOW"
- A/B test 2-3 variations to find what resonates
Content Strategy
- One clear goal per email: Drive clicks, announce news, share content
- Mobile-first design: 60%+ of emails opened on mobile
- Include unsubscribe link: Required by law (CAN-SPAM, GDPR)
- Personalize when possible: Use
{{ first_name }}and segments
Prerequisites: What You'll Need
Before diving into your first broadcast, you'll need three essential components:
- A verified domain – This establishes your sender reputation
- An audience – Your list of subscribers
- A template – The design and content of your email
Don't worry if this sounds overwhelming – I'll guide you through each step!
Step 1: Setting Up Your Domain
Your domain is your email's return address and crucial for deliverability. Here's how to set it up:
Create Your Domain in MailDiver
- Navigate to the MailDiver dashboard
- Click "Create Domain" and enter your domain name
- MailDiver will generate the necessary DNS records
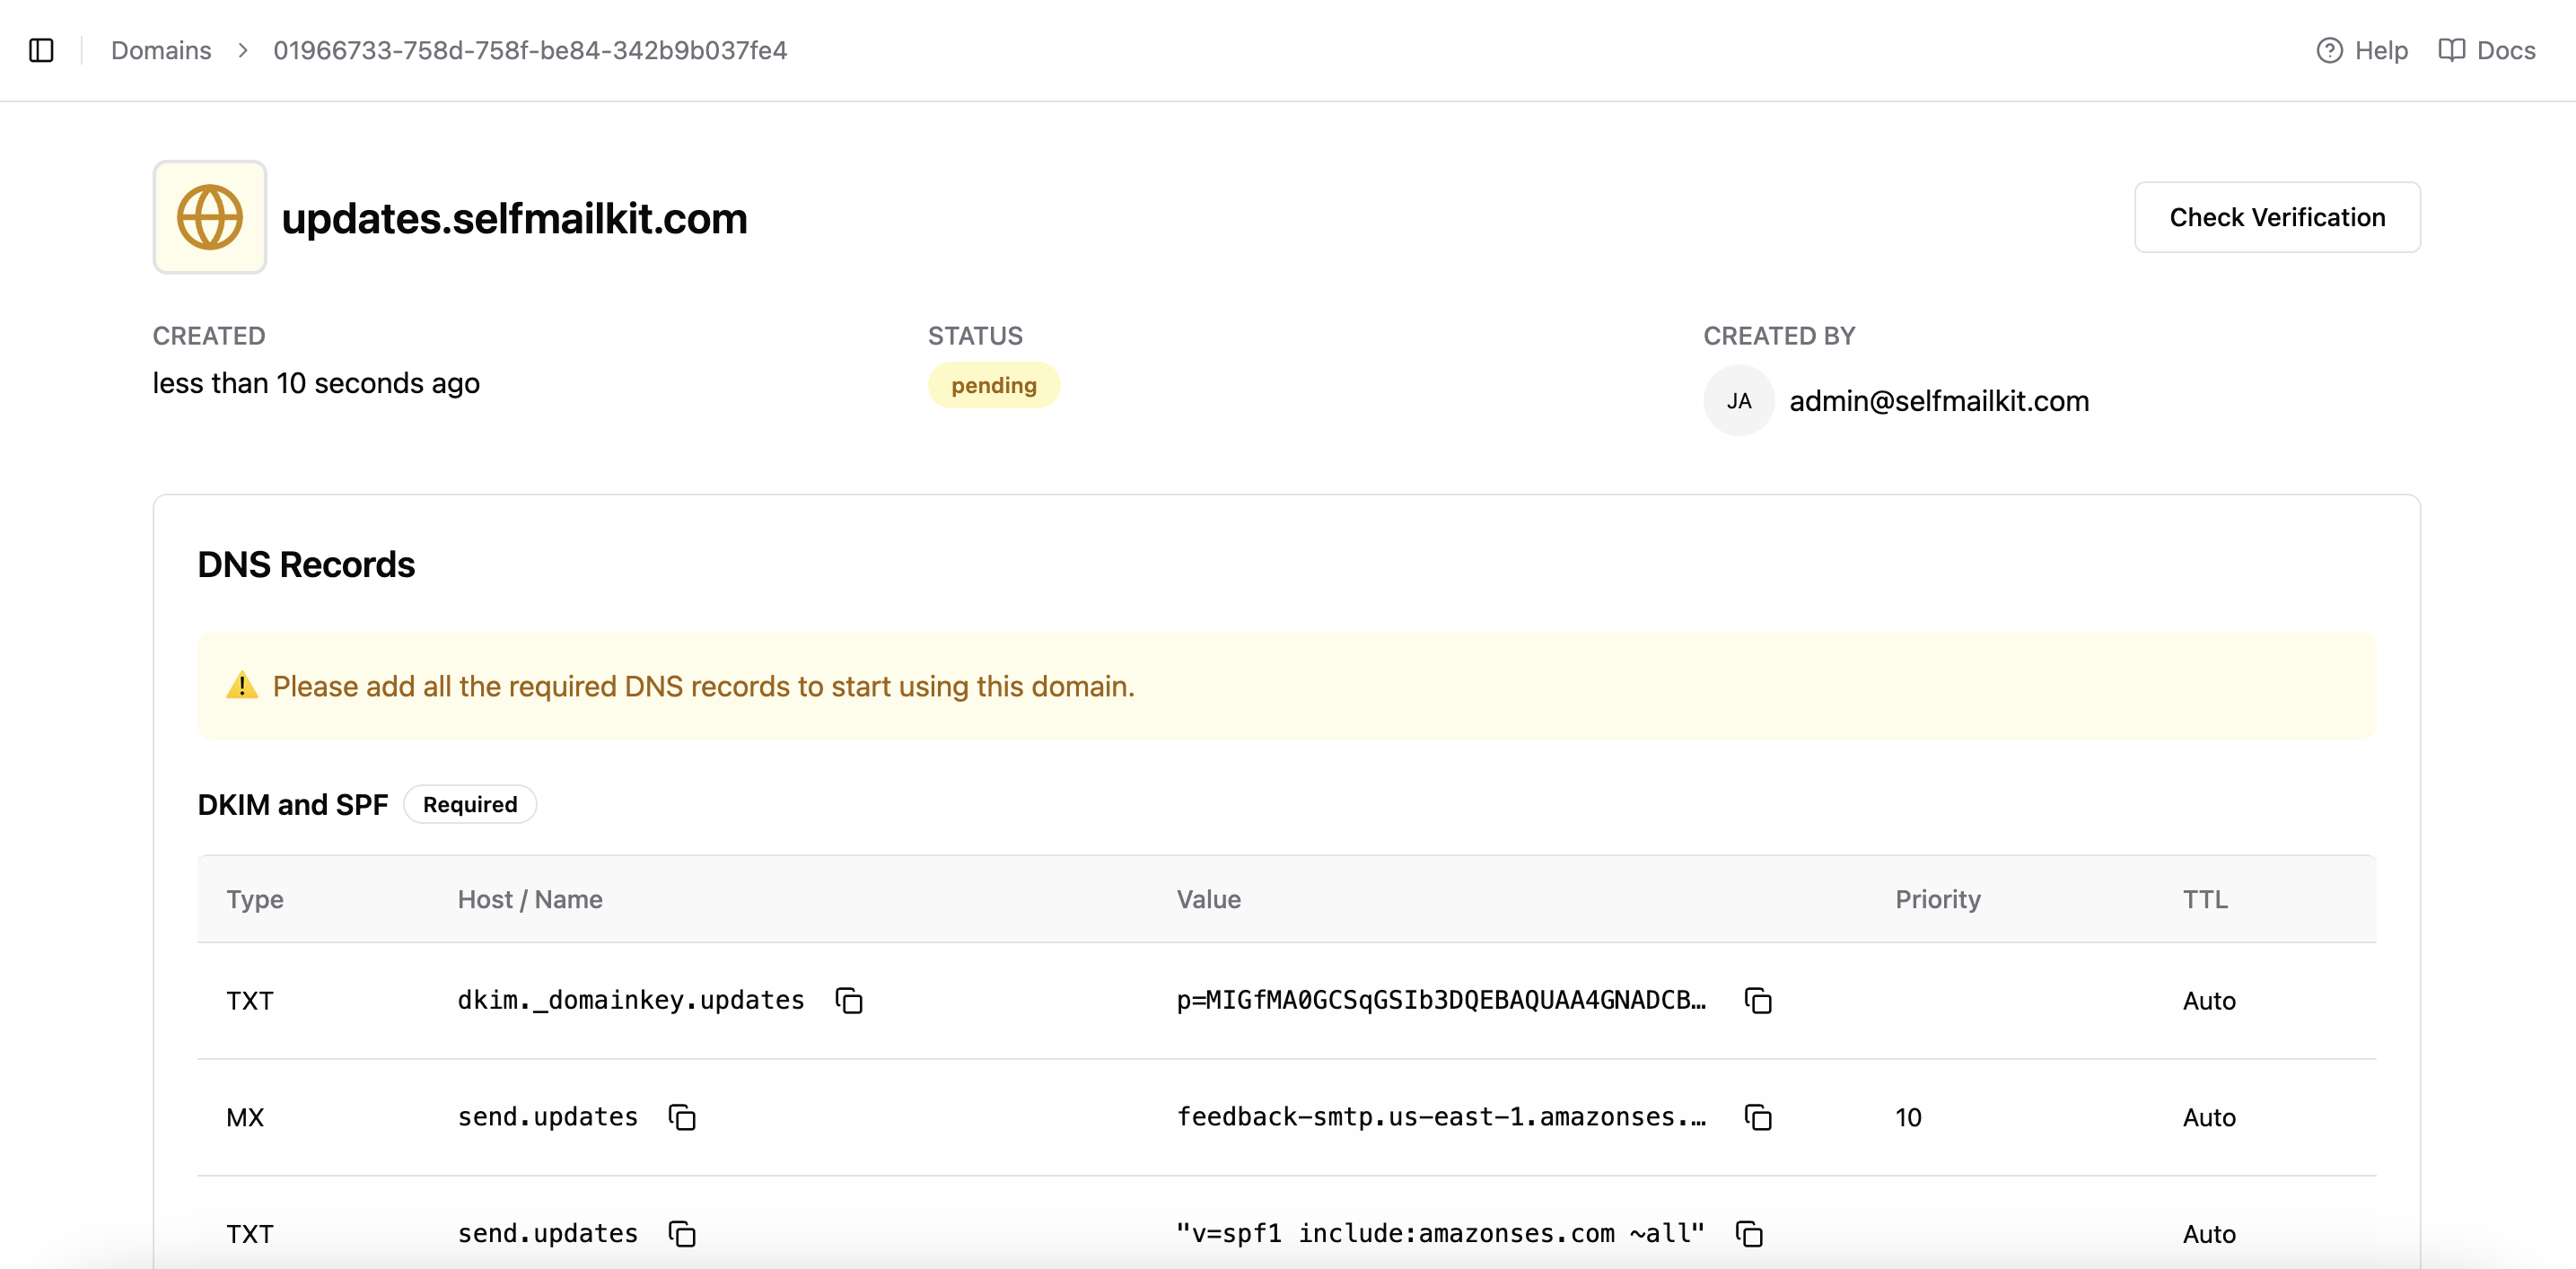
Add DNS Records
You'll need to add several DNS records to your domain provider. This step is crucial – without proper DNS configuration, your emails won't be delivered.
Pro Tip: Most domain providers have detailed guides for adding DNS records. If you're stuck, their support team can usually help you add these records quickly.
The DNS records authenticate your domain and tell email providers that you're authorized to send emails from this domain.
Step 2: Building Your Audience
Your audience is where you add or import your contacts. Here's how to set it up:
Create an Audience
- Go to the MailDiver audiences page
- Click "Create Audience" and give it a descriptive name
- Choose whether to import from CSV or add contacts manually
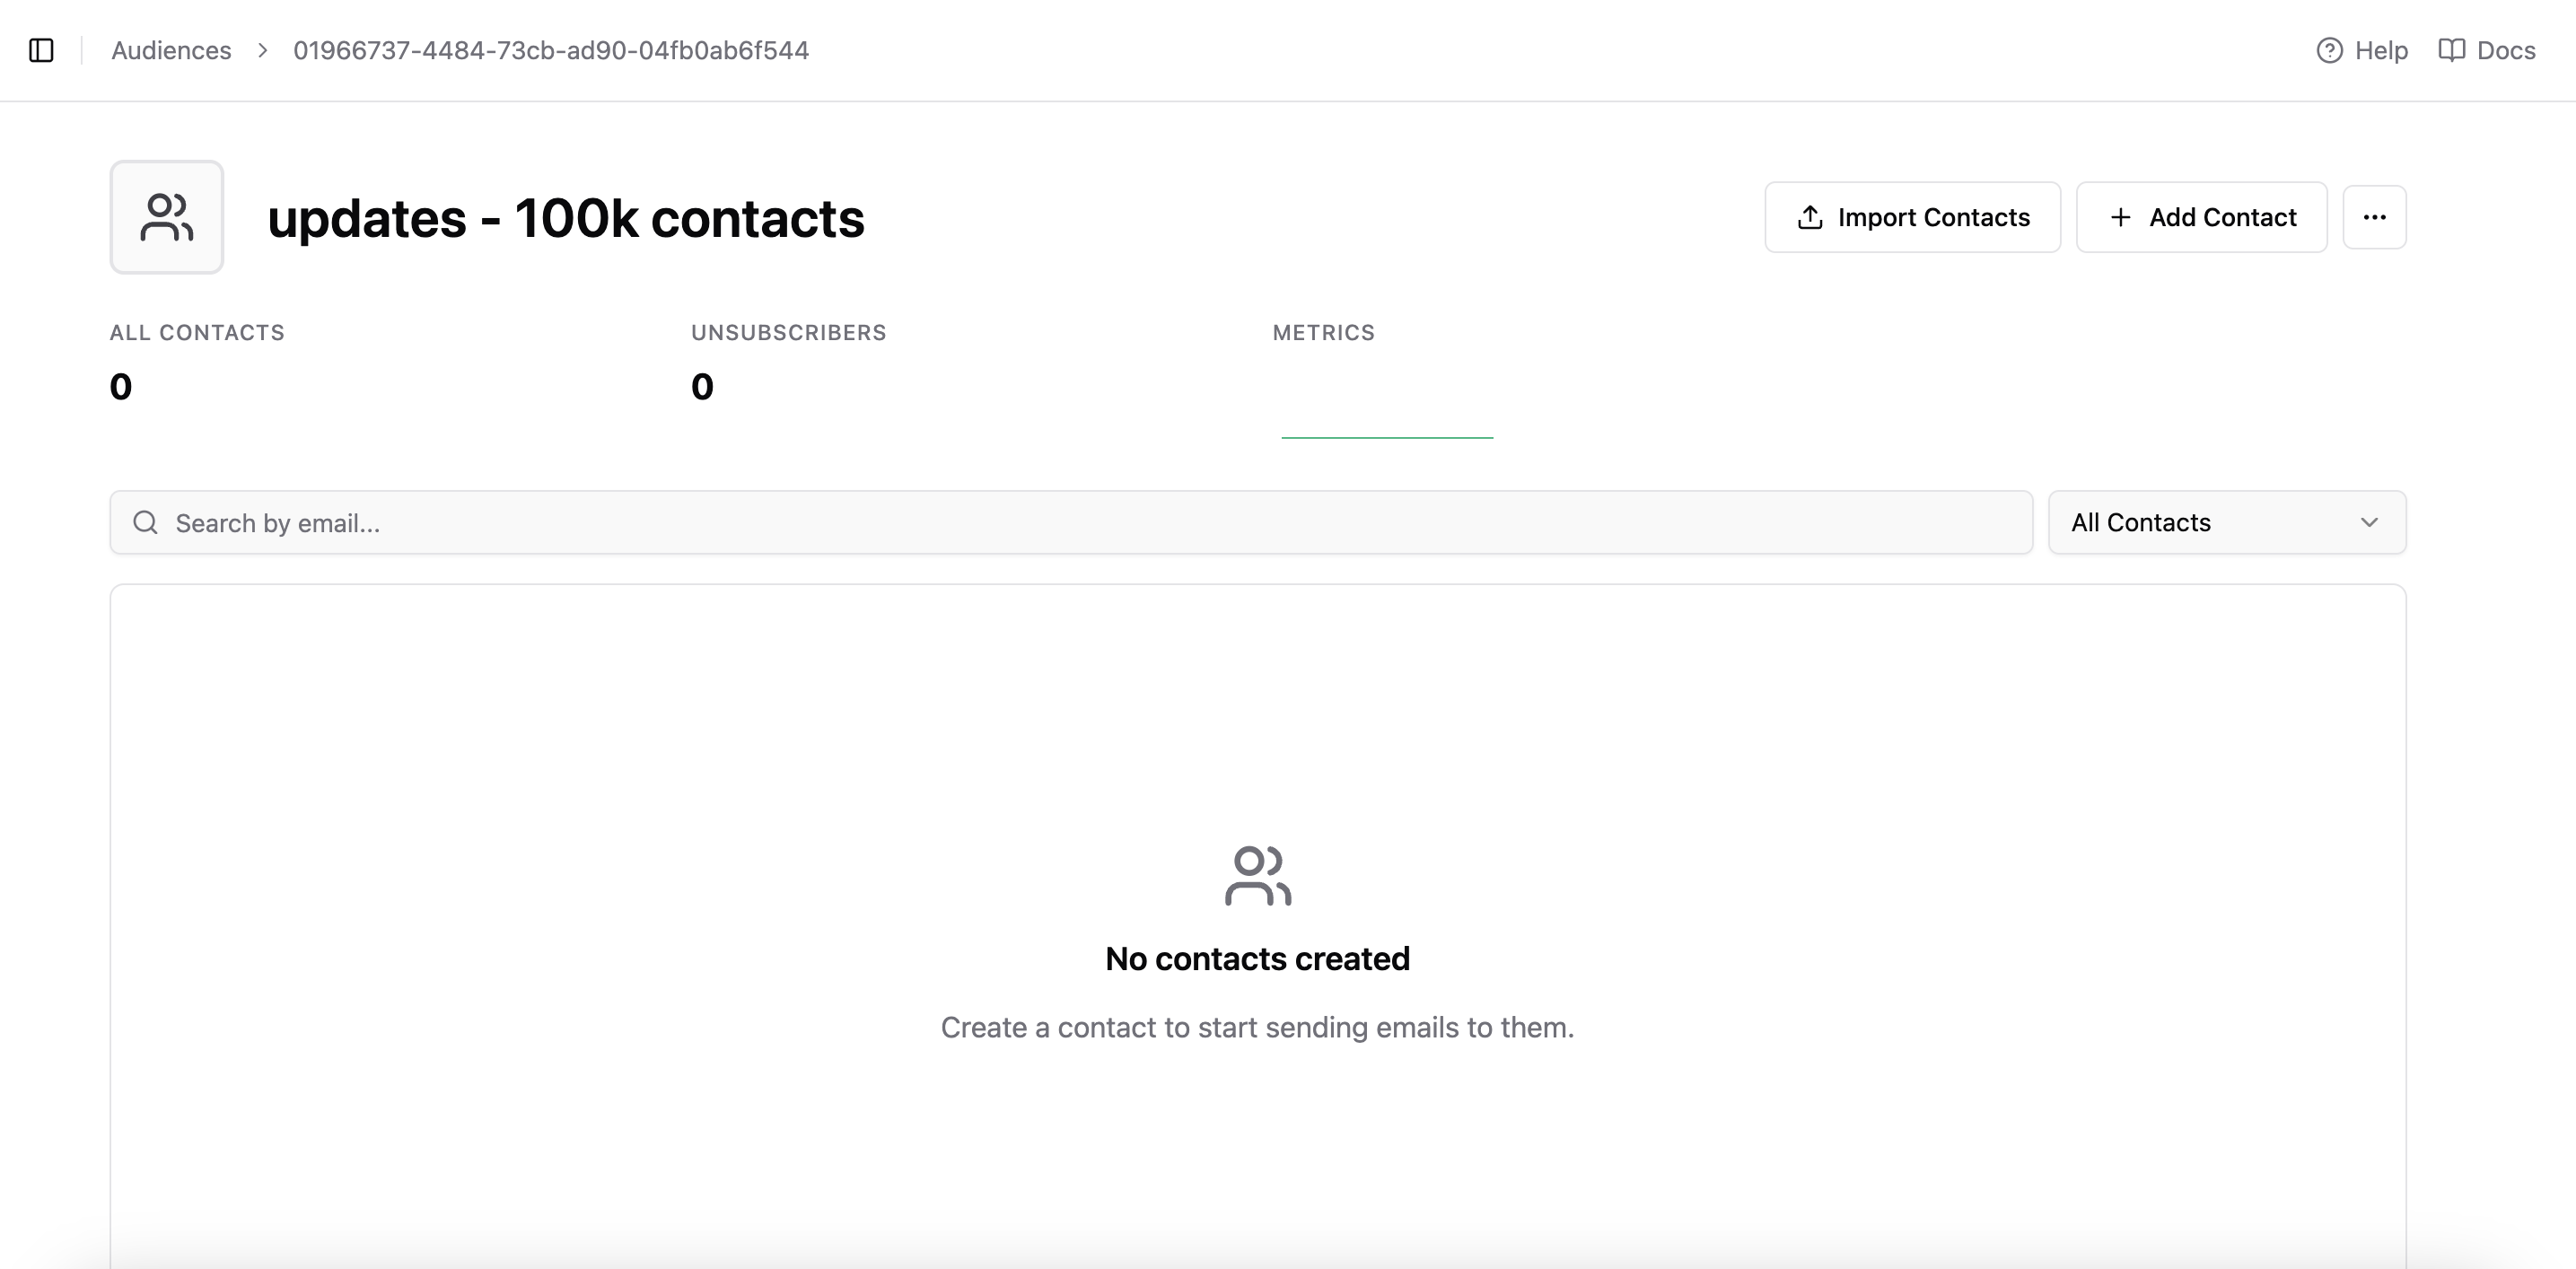
Importing from CSV
If you have an existing email list, CSV import is your fastest option:
- Supported formats: CSV files with email, first name, and last name columns
- Duplicate handling: MailDiver automatically removes duplicates
- Scale: Import unlimited contacts

Important: Only import contacts who have explicitly opted in to receive emails from you. This ensures compliance with email marketing laws and maintains good sender reputation.
Step 3: Designing Your Email Template
MailDiver offers multiple ways to create beautiful email templates:
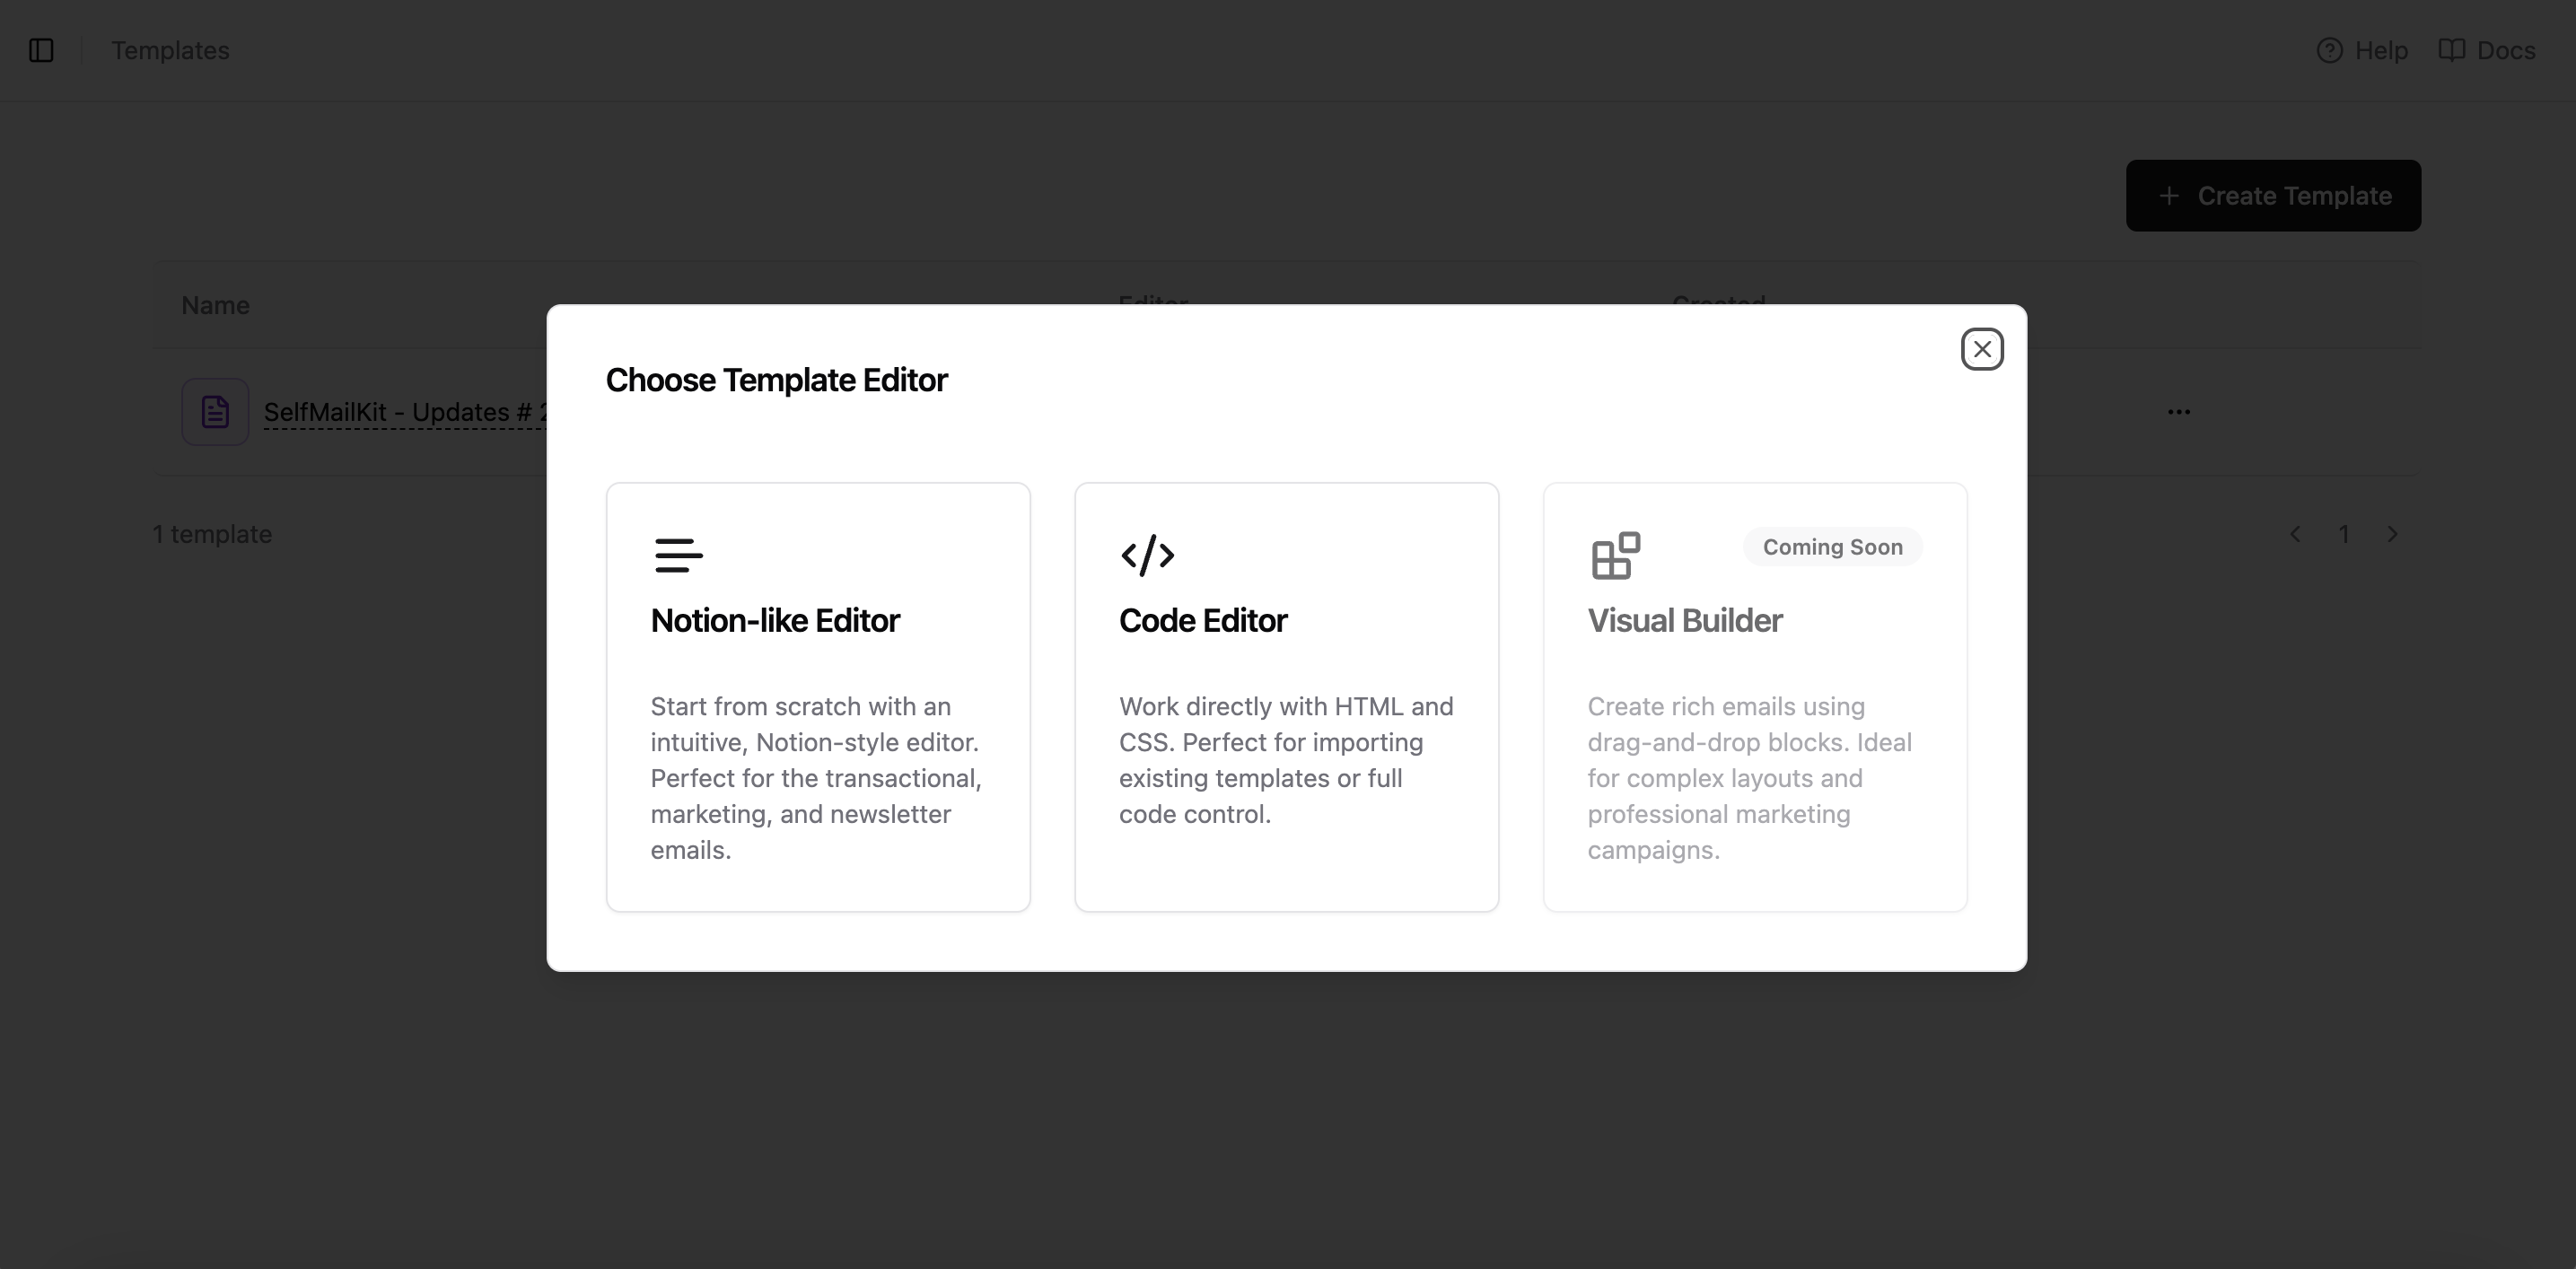
Option A: Notion-Style Editor (Recommended for Beginners)
Perfect if you want a user-friendly experience:
- Intuitive interface: Similar to writing in Notion or Google Docs
- Rich components: Text, images, buttons, icons, and more
- Built-in elements: Automatic unsubscribe footer and styling
Option B: Code Editor (For Advanced Users)
Ideal for developers or those with existing templates:
- Full control: Direct HTML and CSS editing
- Import existing templates: Use designs from React Email or other sources
- Custom styling: Complete creative freedom
Option C: Visual Editor
A drag-and-drop interface for visual designers.
Adding Essential Elements
Unsubscribe Link (Required)
Every broadcast email must include an unsubscribe link:
In Notion-style editor: Type /footer to add an automatic unsubscribe footer
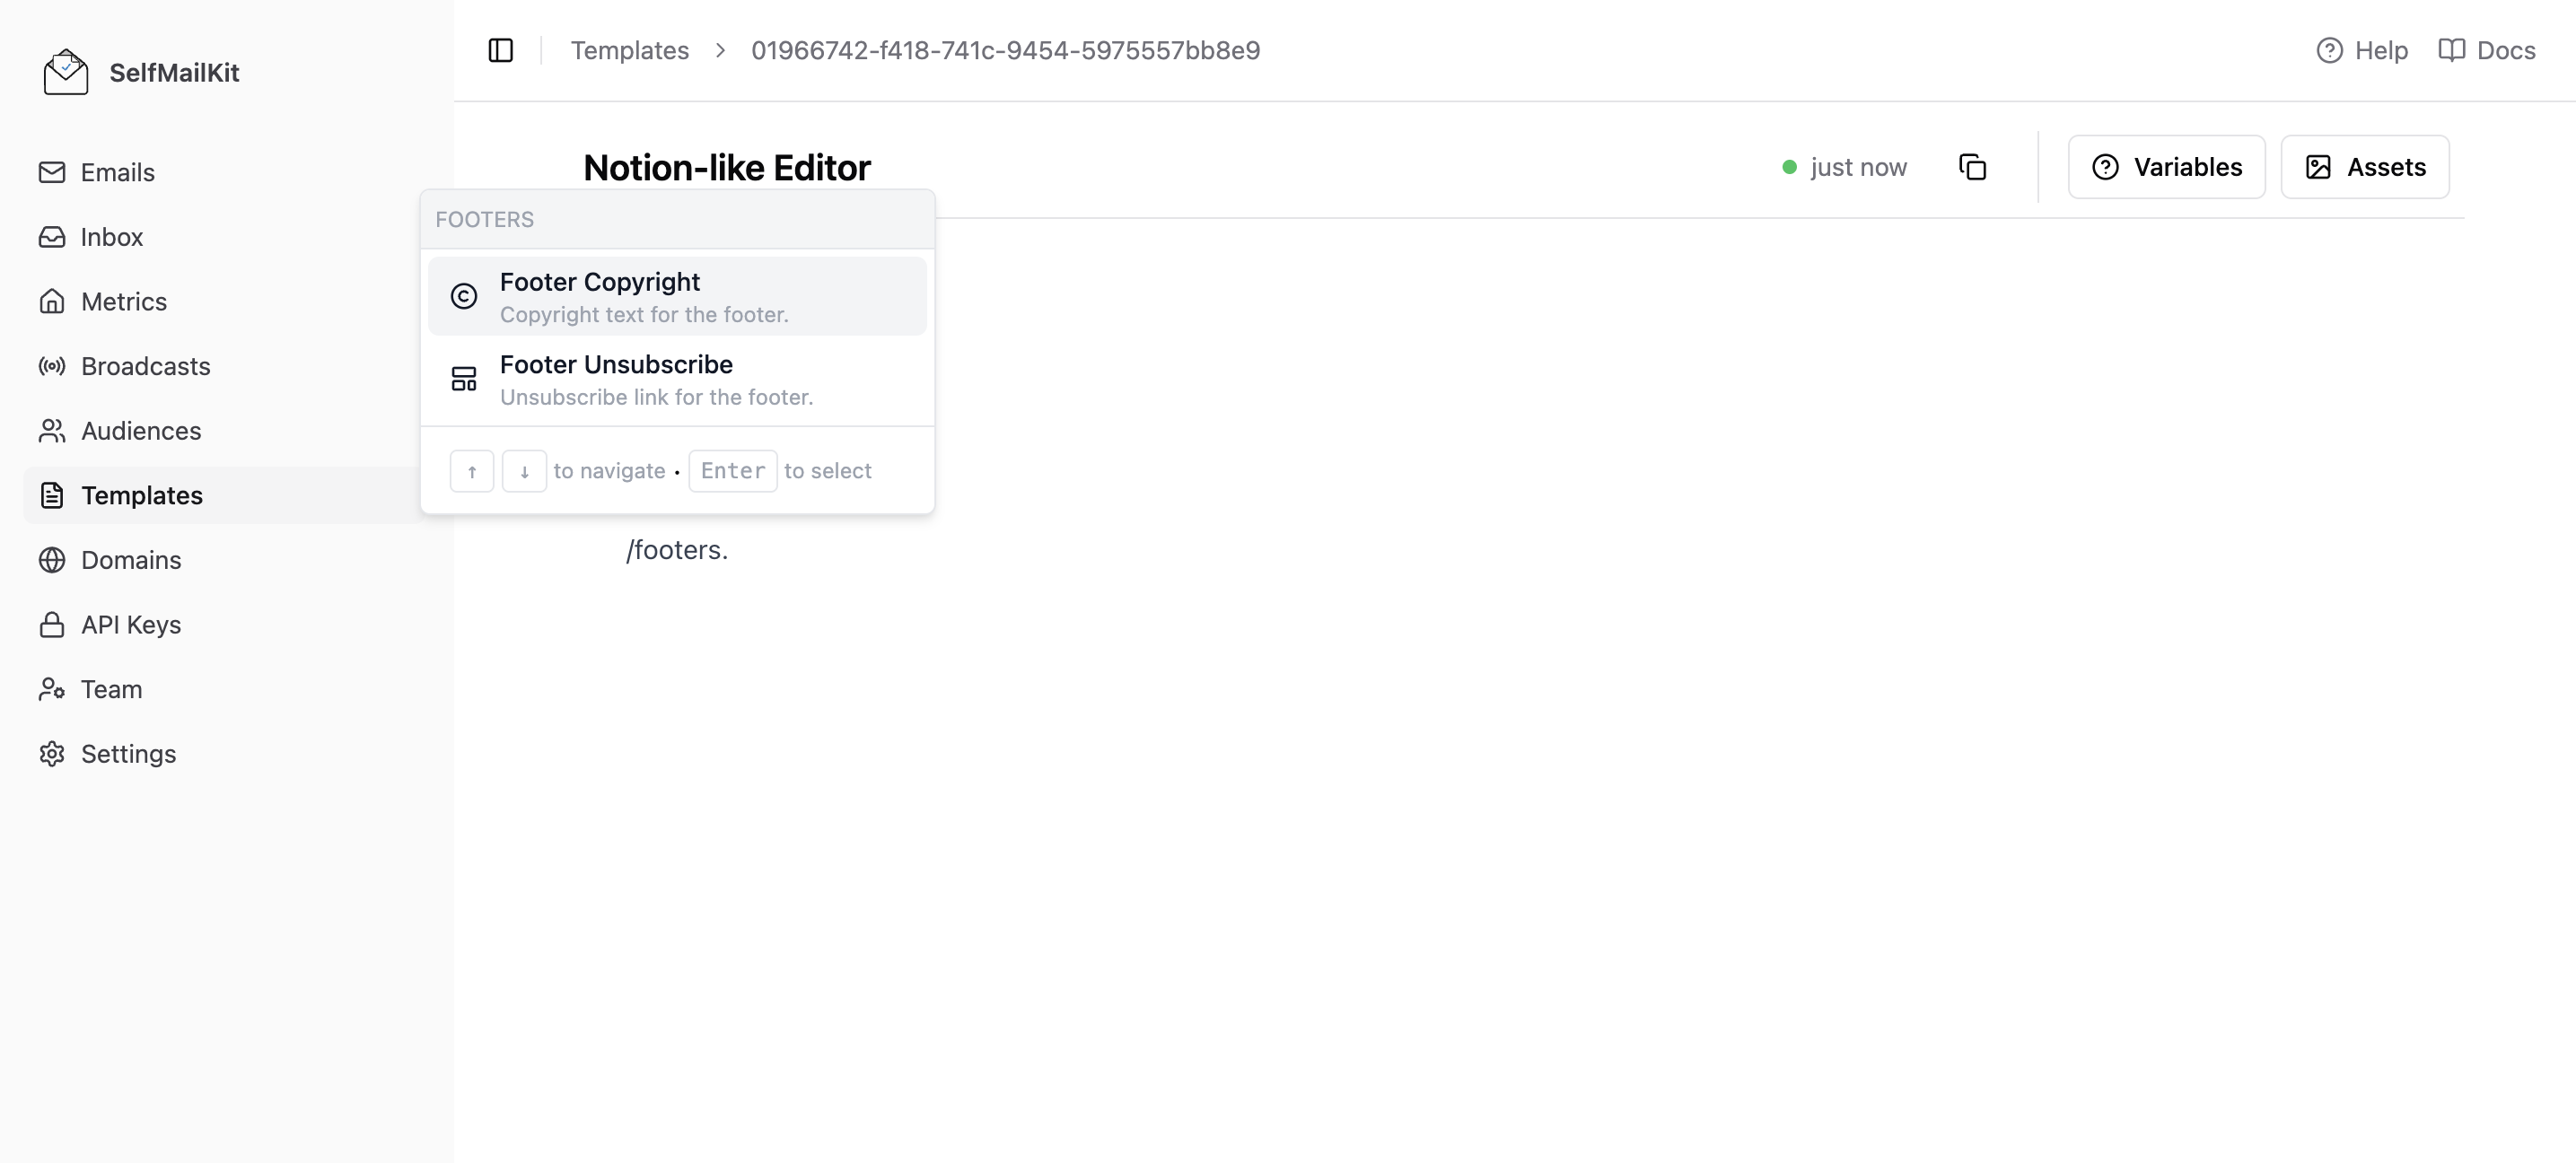
In Code editor: Use the variable {{ unsubscribe_url }}
<a
  href="{{unsubscribe_url}}"
  style="color: rgb(59, 130, 246); text-decoration-line: underline;"
  target="_blank"
>
  Unsubscribe
</a>
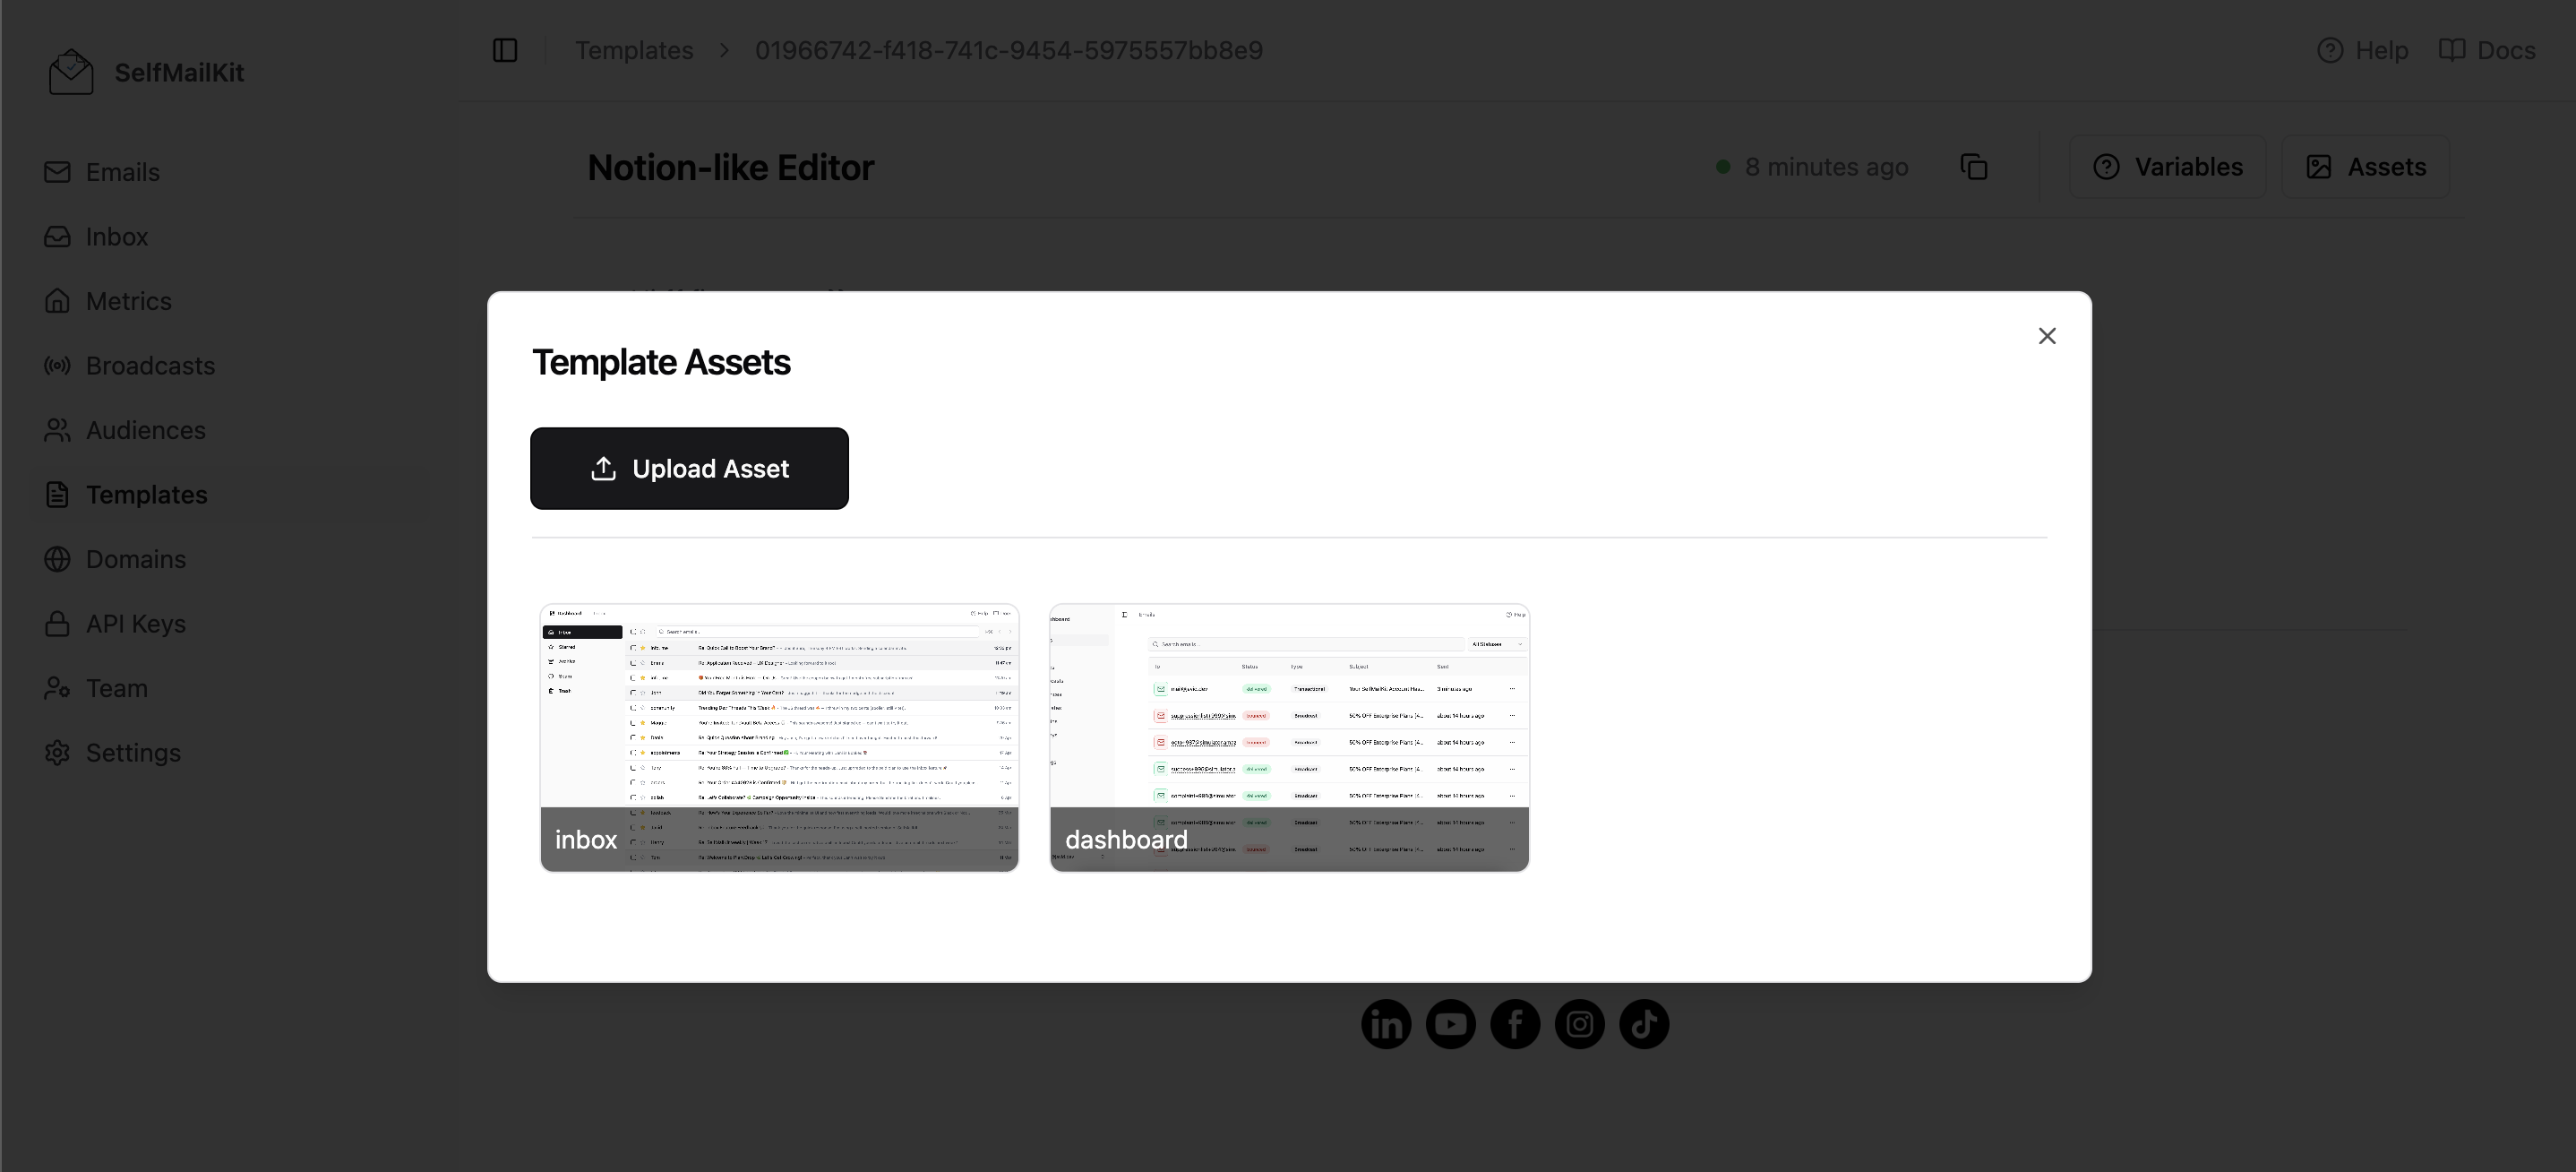
Images and Assets
Upload logos, images, or files directly in the template editor:
- Click "Upload Asset"
- Select your file
- Copy the generated URL
- Use it in your template
Personalizing Your Emails with Variables
Personalization significantly improves email engagement. MailDiver provides several built-in variables:
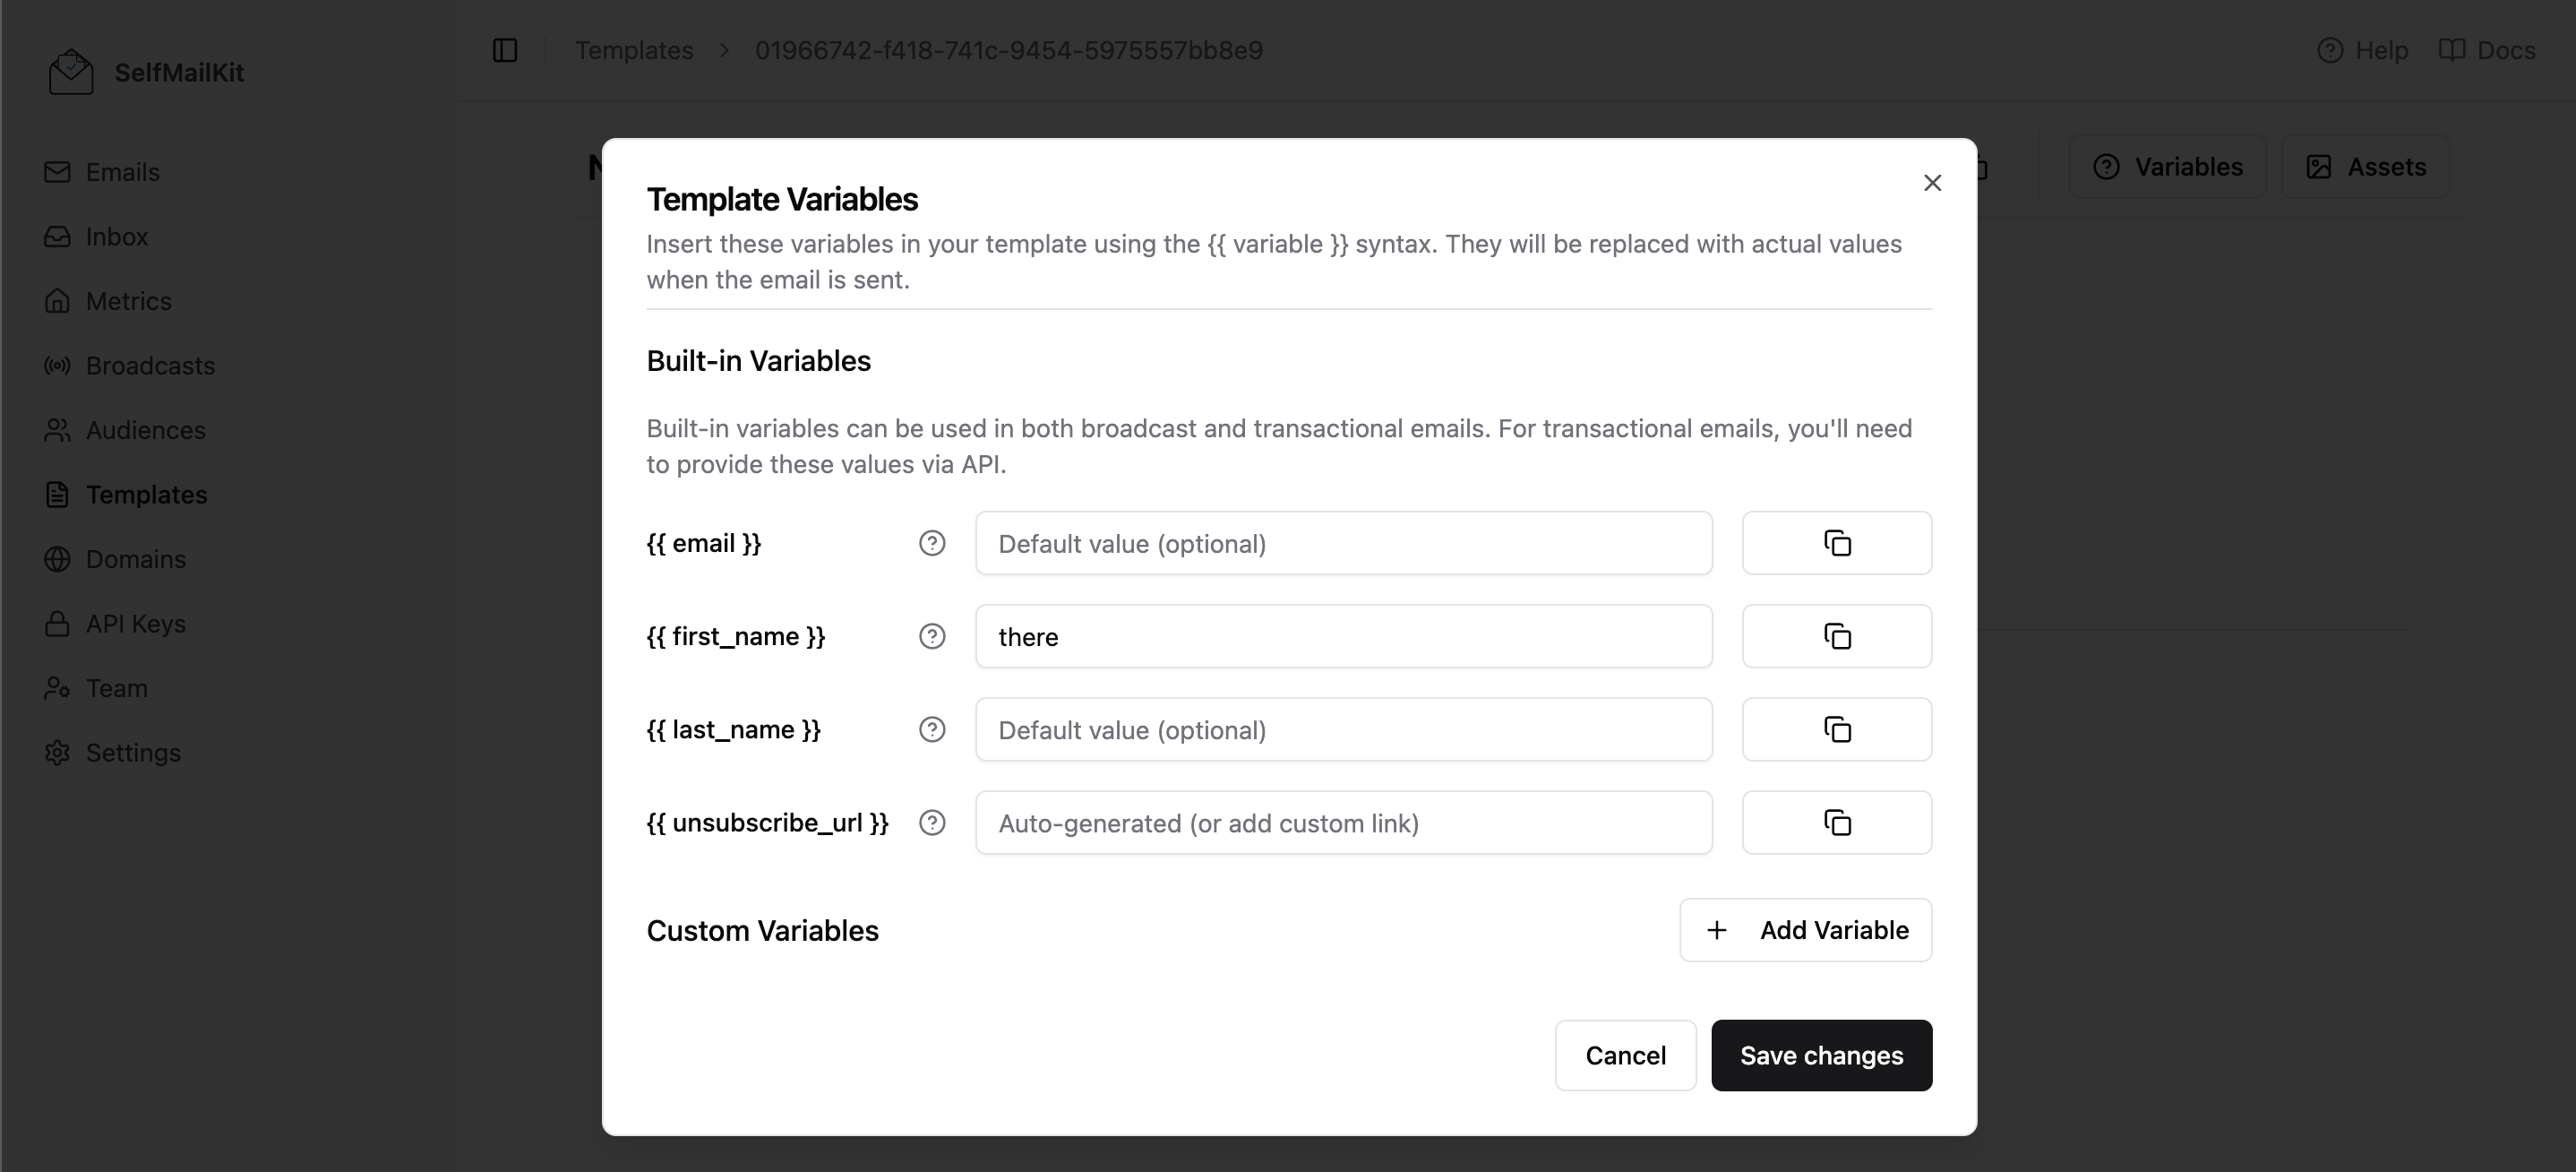
Available Variables
{{ email }}– Recipient's email address (always available){{ unsubscribe_url }}– Unsubscribe link (always available){{ first_name }}– Recipient's first name (if available in your audience){{ last_name }}– Recipient's last name (if available in your audience)
Using Variables Effectively
Hi {{ first_name }},

Thanks for subscribing to our newsletter!
This will display:
- "Hi John," if the first name is available
- "Hi there," if the first name is missing
CSV Column Mapping: When importing, MailDiver automatically maps common column names like "first name", "firstname", "name", etc.
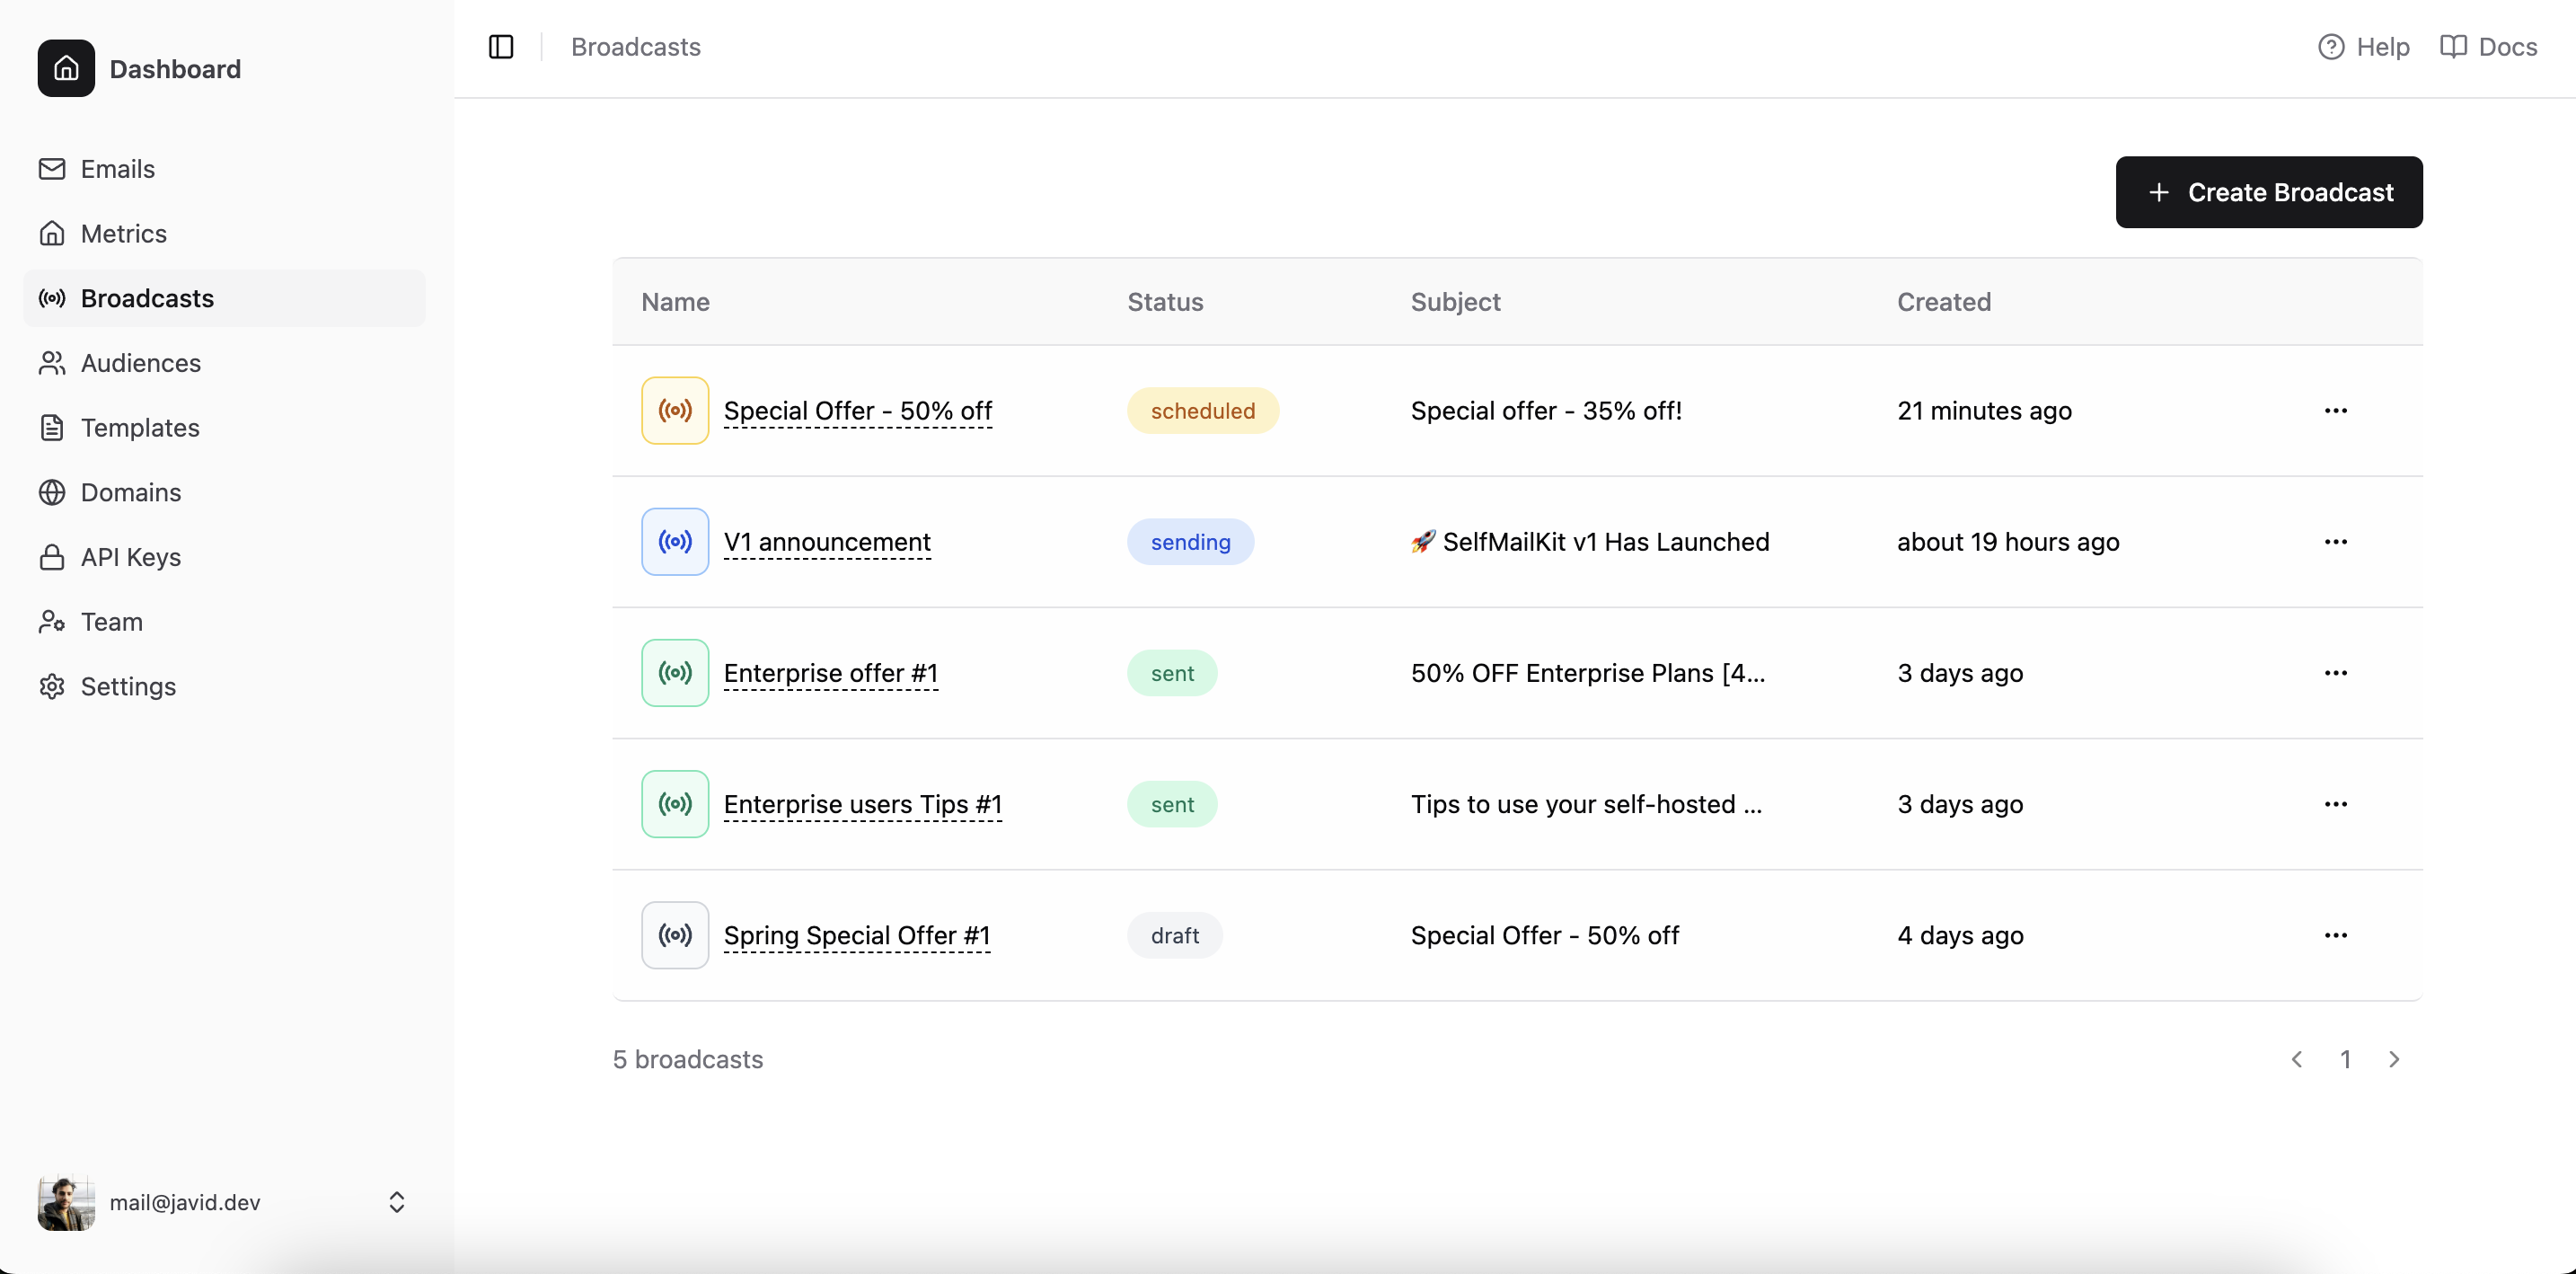
Step 4: Creating and Sending Your Broadcast
Now for the exciting part – sending your first broadcast!
Create Your Broadcast
- Visit the broadcasts page
- Click "Create Broadcast"
- Fill in your campaign details:
- Subject line: Make it compelling and clear
- From name: Use your brand or personal name
- Template: Select your designed template
- Audience: Choose your target audience
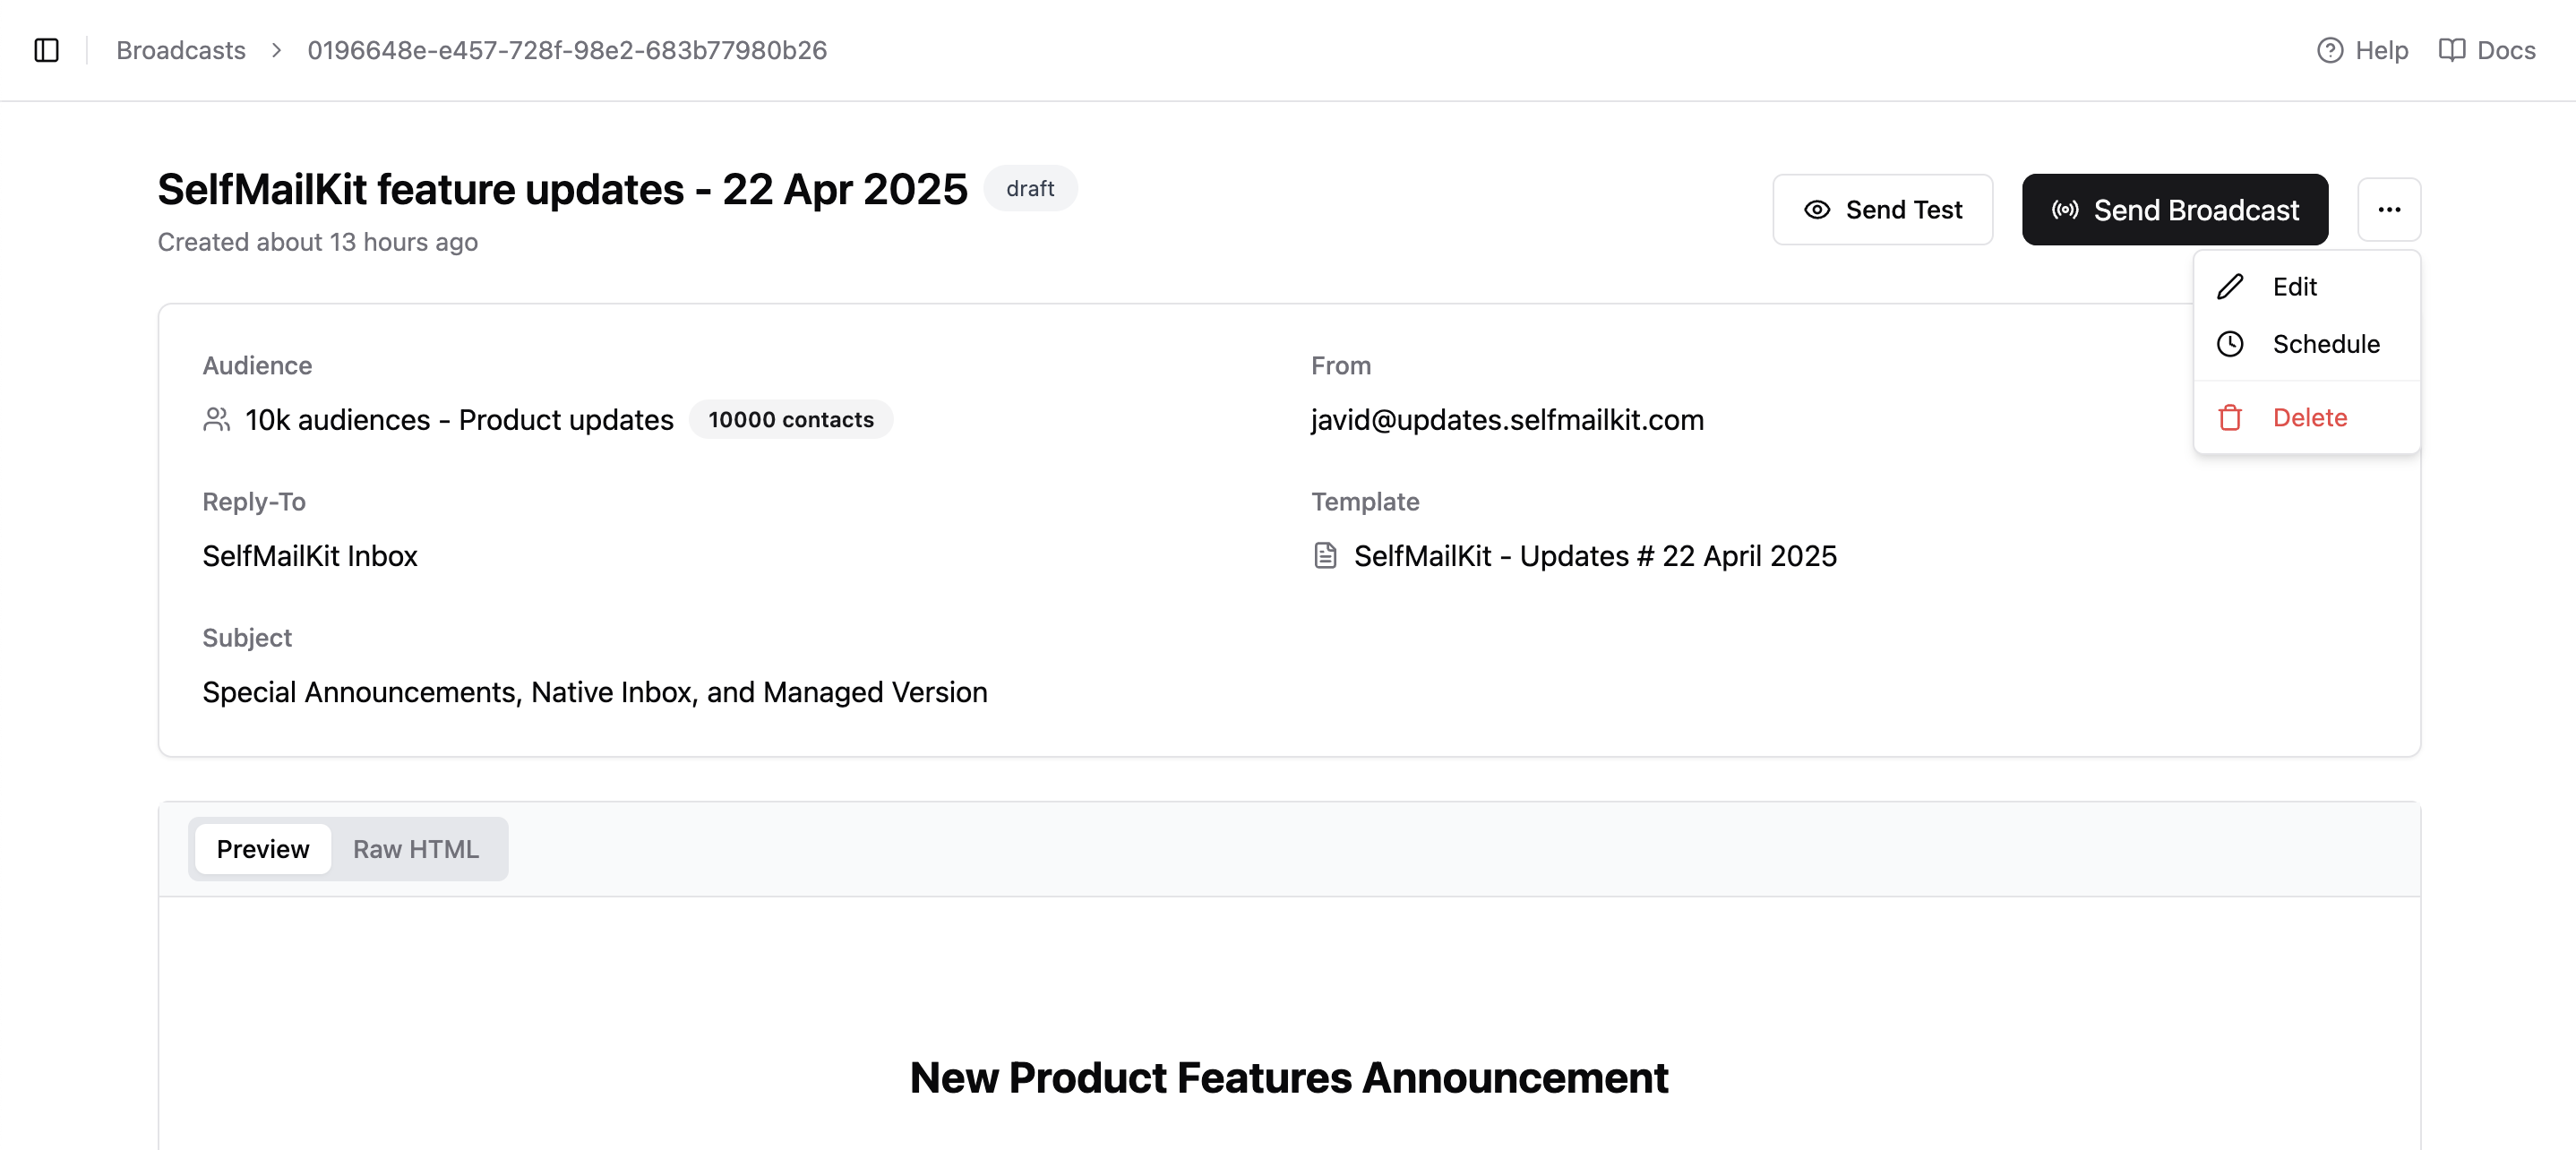
Testing Before Sending
Always send a test email first:
- Click "Send Test Email"
- Enter your email address
- Check formatting, links, and personalization
- Make any necessary adjustments
Understanding Email Warm-up
Here's something crucial that sets MailDiver apart: automatic domain warm-up.
If your domain is new, MailDiver gradually increases your sending volume to build reputation with email providers:
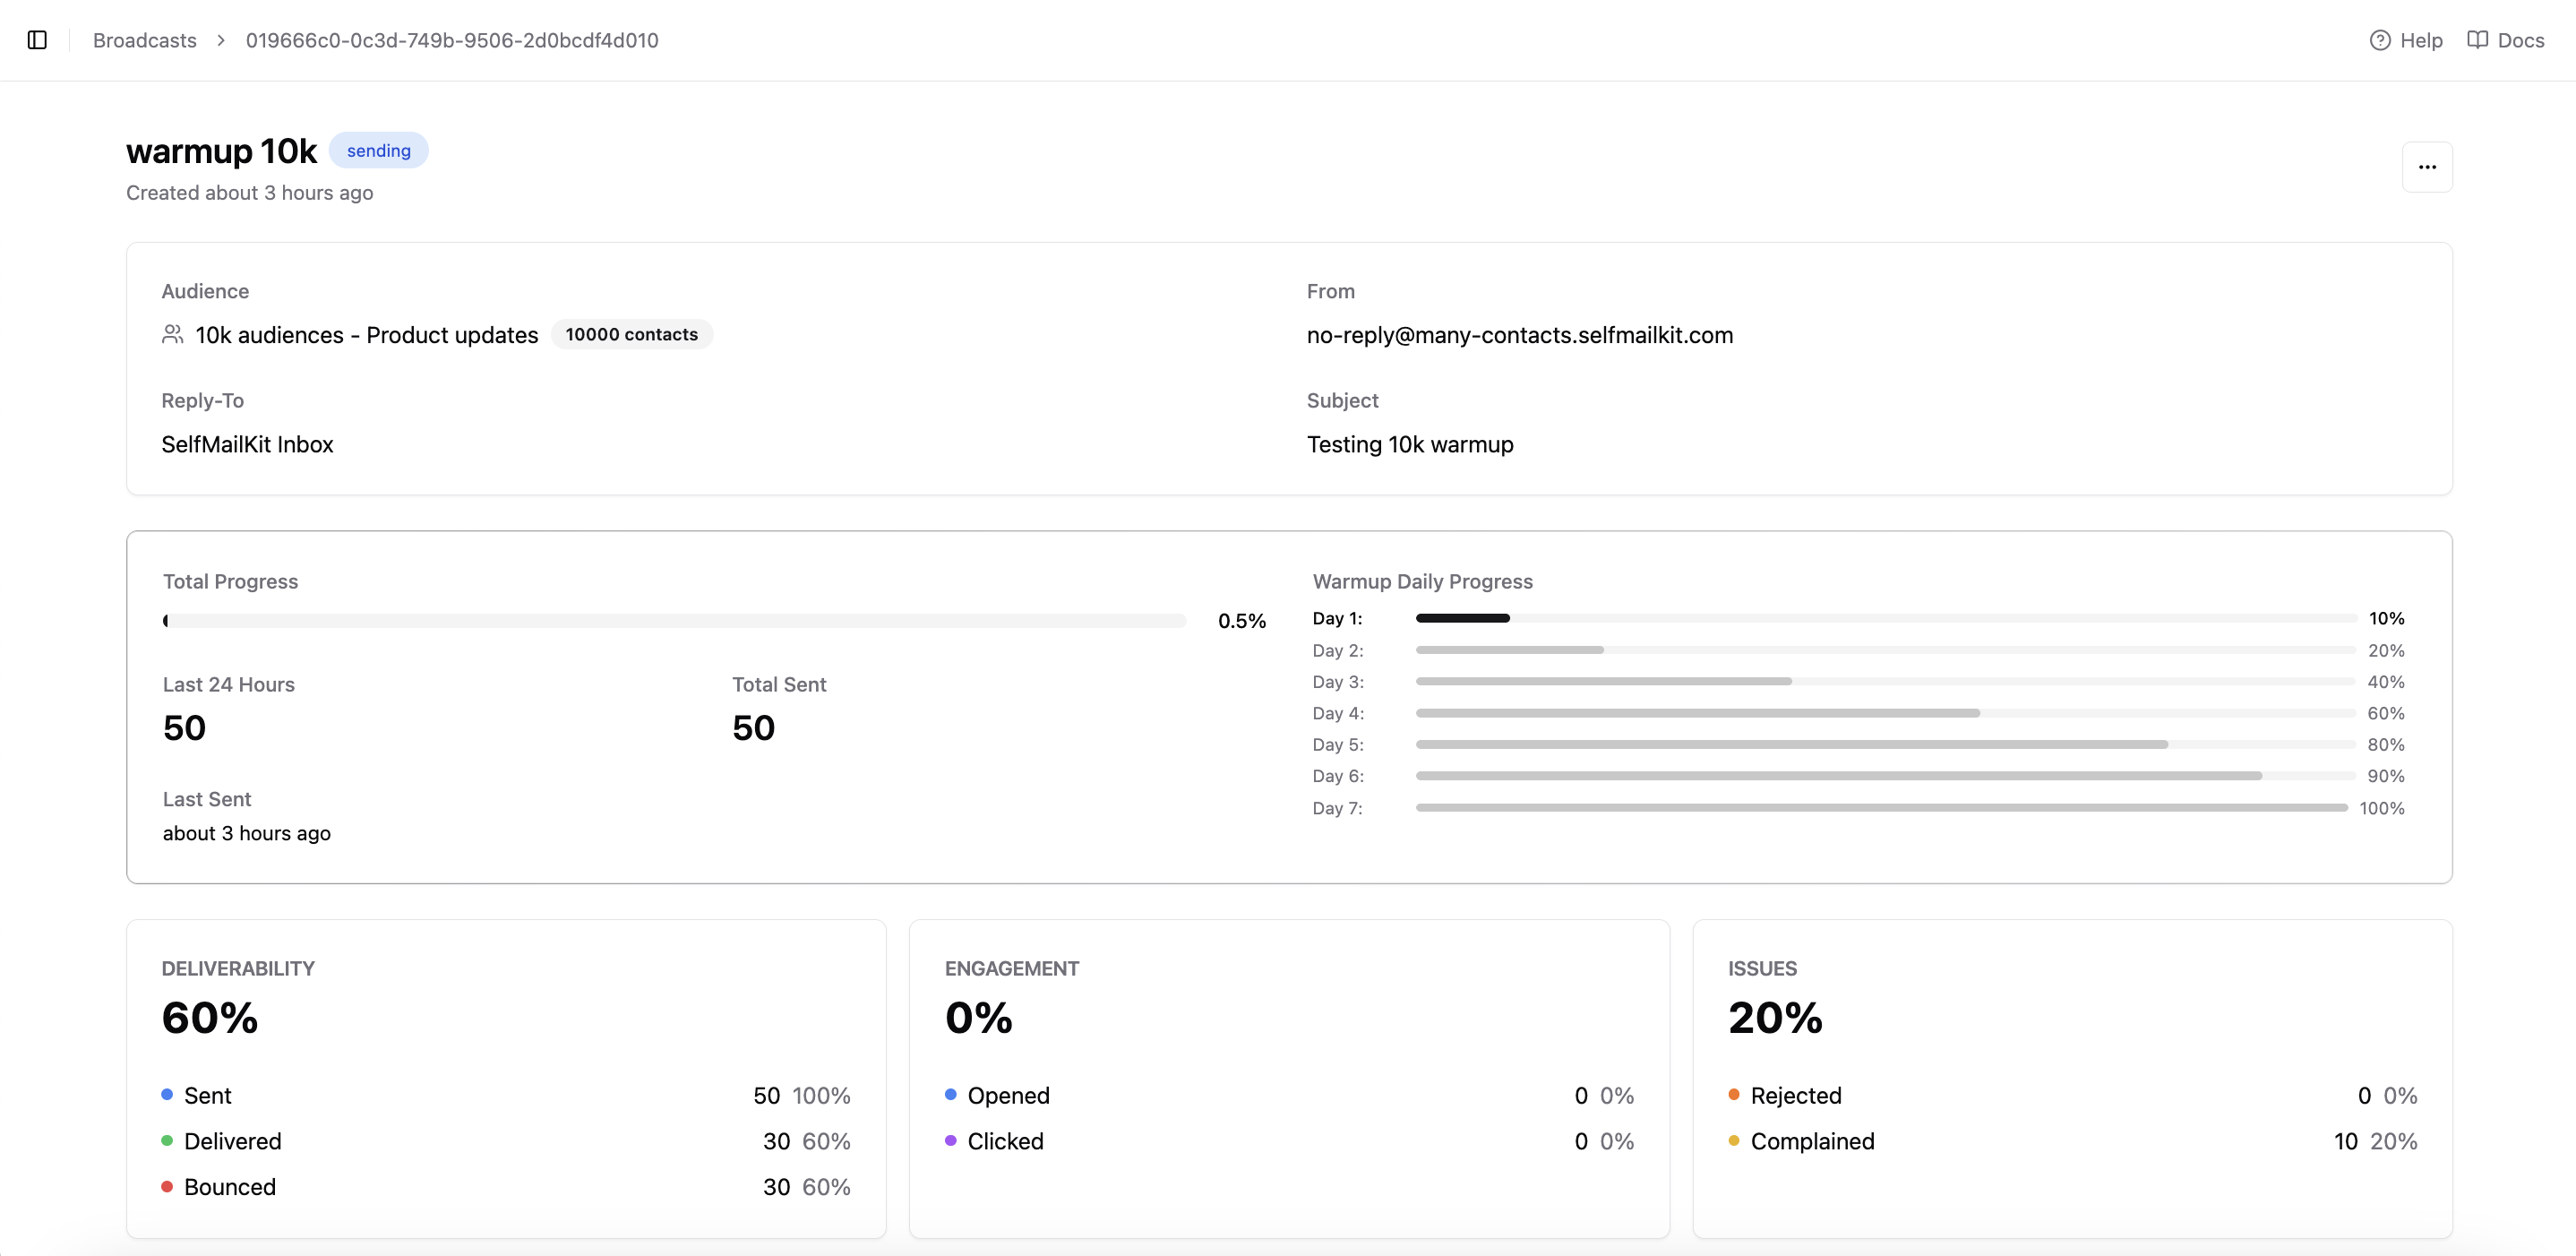
How it works:
- Day 1: Send 50 emails
- Day 2: Send 100 emails
- Day 3: Send 200 emails
- And so on...
This process can take 15-30 days for large lists, but it's essential for good deliverability.
Advanced Tip: If you're migrating from another email service and your domain is already warmed up, you can disable warm-up in your domain settings. Be cautious – sending too many emails from an unwarmed domain can hurt your reputation.
Sending Your Broadcast
Once you're satisfied with your test:
- Review all details one final time
- Click "Send Now" for immediate delivery
- Or schedule it for optimal timing
Analyzing Your Results
After sending, monitor your campaign performance:
- Delivery rate: How many emails were successfully delivered
- Open rate: Percentage of recipients who opened your email
- Click rate: How many people clicked your links
- Unsubscribe rate: Monitor this to gauge content relevance
Visit the emails page for detailed analytics on each campaign.
Want to maximize your email deliverability? Follow our comprehensive email delivery best practices guide to ensure your messages reach the inbox every time. And to understand what makes MailDiver different from other email platforms, read our detailed analysis: Why maildiver.com is different.